Creating a Plan
Set project start date and default calendar
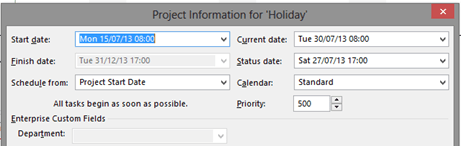
Open the Project Information dialog and choose the required settings. Select Project tab – Project Information.
NOTE: DO NOT SET THE STATUS DATE. Do this only when you update the plan from information from timesheets.
Enter project custom field information (Project Server Only)
To fill out the project custom fields select Project – Project Information.
Check/Create/Modify Calendars
Check that the default project calendar matches your organisations working arrangements.
Modify the calendar to suit if not correct, remember to add in Bank Holidays for the duration of the project. Remembering to click on options and set the default values for a working day, week and month.

Create any additional calendars needed for tasks or as base calendars for resource working patterns.


NOTE: Some project options may be disabled or set centrally when working with Project Server
Choose File – Options.
Check the options you require are selected. Here are some important ones:
-
General
- Date format includes time

- Date format includes time
-
Display
- Check Currency
- Select Entry Bar, to display task entry and edit bar below ribbon
- Check Currency
-
Schedule (This is the most important section to set BEFORE creating tasks)
- Ensure all Calendar Options fit within the chosen Project Calendar
- Set tasks to be Auto Scheduled
- Choose required Task Type
Each of the task types affects scheduling when you edit one of the three elements as follows.
- Ensure all Calendar Options fit within the chosen Project Calendar
|
In A … Task |
If you revise Duration … is recalculated |
If you revise Work … is recalculated |
If you revise Units …. Is recalculated |
| Fixed Duration |
Work |
Units |
Work |
| Fixed Work |
Units |
Duration |
Duration |
| Fixed Units |
Work |
Duration |
Duration |

-
Advanced
- Set the calculation options as required. The suggested options to be selected are:
Move end of completed parts after status date back to status date
Move start of remaining parts before status date forward to status date

- Set the calculation options as required. The suggested options to be selected are:
Create Work Breakdown Structure
Create your task list and indent/outdent to create summary tasks and subtasks.

Or use the Insert group on the Task tab to insert different types of tasks into the project

NOTE: DO NOT SET DATE FOR TASKS!
If you do constraints will be added.
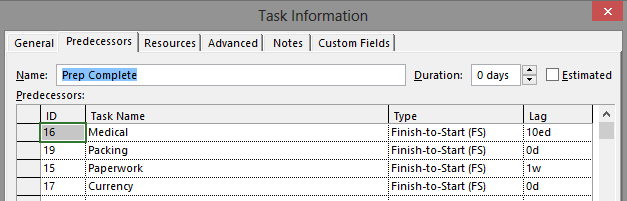
Link tasks
Right click on the task to be a predecessor to another task and select task information.
Choose the predecessor task.
Select the task type. Typically Finish to Start (FS) will be used.
Task Types can be
| FS | Finish to Start | DEFAULT. Most likely to use |
| SS | Start to Start | |
| FF | Finish to Finish | |
| SF | Start to Finish | This is backwards, DO NOT use |
Add in positive or negative lag.
NOTE: DO NOT ADD LINKS TO SUMMARY TASKS!!! If you do this you run the risk of getting the plan in a loop. This can cause project to completely lock-up.
Enter task duration and work
Fill in the Duration / Work columns for each task
The duration is the working time a task will take
The work is the number of man hours that a task will take to complete over the duration. E.g. 15 hours work over 1 month duration.
As the plan is altered you will see which values are altered as they are highlighted in blue for each action.
Assumptions project makes:
- when putting in numbers in the work column, project assumes you are entering hours;
- when putting in numbers in the duration column, project assumes you are entering days.
To override these assumptions append the number with the following
| m | for minutes |
| h | For hours |
| d | For days |
| w | For weeks |
| mo | For months |
| There is no abbreviation for years, so use months or weeks. Strangely 12mo = 240days and 52w = 260days! | |
| ed | Elapsed days (24 hours) – ignores project calendar |
| eh | Elapsed hours – ignores project calendar |
Dates – Deadlines/Constraints

You can add deadlines for tasks. This adds a green arrow to the task on the Gantt chart. You can find this in task info – advanced task.
Use deadline over constraints as it makes your project plan more flexible. When using constraints MSP will force the plan according to the constraint and not give you a warning.
Look in the column with the  symbol at the top. This column can indicate a task has a constraint.
Available constraints for tasks
| As soon as possible | DEFAULT for projects scheduled from the project start date (which is default and best option). Select to remove other types of constraint. | |
| As late as possible | Default for projects scheduled from the project end. Select to remove other types of constraint on projects scheduled from end date. | |
 |
Finish no earlier than | Task can only be moved one direction in time |
 |
Start no earlier than | |
 |
Finish no later than | |
 |
Start no later than | |
 |
Must finish on | Task with these constraints have no flexibility |
 |
Must start on |

Display task 0
To show Task 0, select Gantt Chart Tools – Format – Show/Hide – Select Project Summary Task
Task 0 shows the overall project start and finish dates.
Add resources to the project plan
Show the resource sheet by selecting View – Resource Sheet.
Create your resources or add from resource pool, if using Project Server
Work resources are people or those resources used up by the hour. Material resources are used by units (e.g. Boxes of paper). Cost resources are used to reflect task costings and have no default value.
In the “Max. Units” column it currently shows 100%. This means that 100% of calendared working time for that resource is available to this project. You may assign up to 9 times that level but once the amount in the max units is exceeded the resource will show as overallocated.
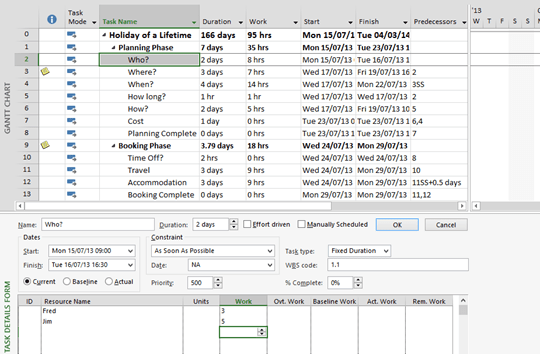
Assign resources to the plan

Switch back to the Gantt chart view and show the task details form by selecting Details then choose the Task Details Form from More Views.
Choose the Resource Work form by right clicking on the grey area to the side of the form and selecting Resource Work.
Click on a task then add the person/people you want to work on this task by clicking in the “Resource Name” column in the form below.
Now add in the hours they will be working on the task for. Project will then work out the units based on the duration and hours.
Alternatively use the Assign resources dialog box to assign your resources.
TIP: If more than one resource will work on the task add them together, as project recalculates the schedule when you add or remove resources.
WATCH OUT! Especially if you add in different hours for different people for a task as project can do strange things with the unit’s allocation.
When changing hours look for the  symbol. If you see this, hover over it and select the option you want from the options it suggests. i.e. the resource will work longer/shorter hours to complete the task.

Level the plan manually
Switch to the resource sheet to look if anyone is over allocated by selecting the View Resource Sheet. Any person with dates shown in red is over allocated.
You can also look at the resource graph by selecting the View Resource Graph.
The left hand scroll bar changes the person, and the right hand scroll bar changes the dates
Useful Short cut keys:
Pressing the “Alt+Home” keys jumps to the beginning.
Pressing the “Ctrl+Home” keys jumps to the top.
The resource usage sheet is great for seeing hours per task for everyone on a calendar.
The task usage sheet is more useful as the resource usage sheet doesn’t show you other tasks a person may be doing per day.
NOTE: WHEN YOU SAVE YOUR PLAN THE UNDO LIST IS CLEARED!!!
Set baseline

When the plan has been finalised, set the base line
Change to the tracking Gantt view. You’ll notice bars have different colours.
Tasks in red are on the critical path. These are task where if the duration changes the project end date will change. Tasks in blue are not on the critical path and have slack.

Set the baseline only when the project plan has been agreed with management for the first version (Project Tab – Schedule Group – Set Baseline – Set Baseline). Choose ‘Baseline’ from the Set Baseline drop down list and select OK.
Each of the plans tasks are now shown again under each task in grey.
NEVER OVER WRITE THIS BASELINE!
Updating Project Plans
Open the plan to update it.
Set status date
To set the status date, select Project – Project Information…
When the Project Information window opens set the status date for the date to which you have accurate progress information (Add a red dashed line in the Tracking Gantt Chart to show the status date).

Record Progress
Record progress achieved by status date. Typically this will be done in the Tracking Gantt, with the Tracking Table selected. The split view including the Task Details Form can also be very helpful.
This can be done by:
- Setting % complete
- Setting any combination of Actual Start Date, Actual Finish Date, Actual Work, Remaining Work, Actual Duration or Remaining Duration. NOTE: that some combinations overwrite each other, so watch what happens as you make changes and be aware of the change highlighting.
- Entering time phased actuals. This is done in the Task Usage or Resource Usage view. In the usage view right click in the area on the right hand side and choose Actual Work. Change the timescale so that you can enter the actual work in the appropriate time blocks (e.g days or weeks). Enter actual work and update the planned hour into the future.
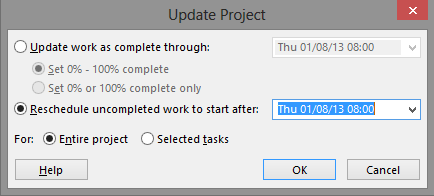
Reschedule tasks
First save the project in case anything goes wrong when you reschedule.
To get MSP to automatically reschedule tasks select Project tab – Status group – Update Project. This moves tasks that should have already started.
Once MSP has changed the plan, revisit the plan and check out what it has changed. MSP may add in constraints for tasks it moves!